How to Repair a One-Handle Leaky Faucet
Enhance your One-Handle faucet repair knowledge with detailed installation instructions and a “How to” video.WATCH VIDEO
![]()
How To Instructions
Step-by-step Instructions
Your kitchen faucet gets a lot of use, so you want to keep it in tip top shape. If you find that your single handle, ball type faucet is leaking water, you can replace a few of its parts without spending a lot of time and money on a new faucet. The best part is, you can do it all by yourself.
Tools required: Allen wrench, wrench, smooth jaw pliers, screwdriver, cleaner to remove mineral build-up
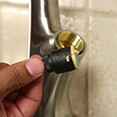
1
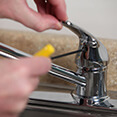
Turn off the water supply to the sink. Remove the handle screw with an Allen wrench, and then remove the handle from the Faucet.
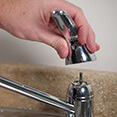
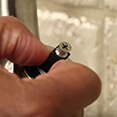
2
Loosen the cam nut to reveal the plastic cam and ball assembly. The cam nut is a cone-shaped piece below the handle. Find the slotted nut at the top and grip it with pliers. Turn the cam nut counter clockwise to remove.
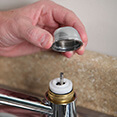
3
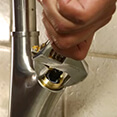
Use a wrench to loosen and remove the retainer nut. Lift out the plastic cam and cam gasket to expose the ball and remove the ball from the faucet.
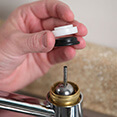
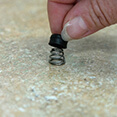
4
Remove the ball from the faucet assembly by lifting out. Then pry the rubber seals and springs out of the body with a thin blade.
Before installing the new parts, thoroughly clean the inside of the faucet body with cleaner intended to remove mineral build-up or use plain vinegar.
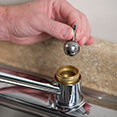
5
Install the seats and springs FIRST. Insert the spring wide-end down then place the rubber seat over the narrow end of the spring. (Note: You may find it easier to assemble the springs and seats in this order outside of the faucet on a counter and then place this assembly onto the tip of a screwdriver and insert them into the faucet body).
6
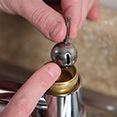
Place the Ball back into the Faucet Assembly. The Ball may have a notch that fits a small peg inside the faucet. Align the peg and notch on the ball assembly to ensure proper installation into the Faucet. Install the replacement Gasket Cam and Plastic Cam over the top of the Ball and place the Cam Nut over the Plastic Cam, and then tighten the Nut with Pliers.
7
Reinstall the faucet Handle by placing on the cam nut and tightening the set screw with an Allen wrench. Turn water supply back on and test for leaks.
Step-by-step Instructions
Your kitchen faucet gets a lot of use, so you want to keep it in tip top shape. If you find that your single handle, cartridge (disk faucet)faucet is leaking water, you can replace a few of its parts without spending a lot of time and money on a new faucet. The best part is, you can do it all by yourself.
Tools required: Allen wrench, wrench, smooth jaw pliers, screwdriver, cleaner to remove mineral build-up.
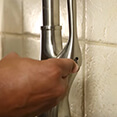
1

Turn off the water supply to the sink. The water shutoff is usually found directly under the sink and consists of a small valve and a small handle.
Remove the handle screw with an Allen wrench, and then remove the handle from the Faucet.
2
With the handle removed the disc cartridge is now exposed. Some styles of cartridges have a retainer nut, retainer clip or screws that hold it in place. In this example, remove the retainer nut which secures the disc cartridge.
3
Lift the cartridge out of the faucet body. You may need to use some pliers since these can get stuck a little. If the cartridge is stuck, gently grab it with the pliers and pull it out.
If the rubber seals are damaged or cannot be cleaned then they need to be replaced.
Take your old cartridge to your local Lowes home improvement store and use the Perfect Match locator system or use the online Cartridge Selector Tool. This system makes it easy to find your replacement part.
4

Before installing the new cartridge, thoroughly clean the inside of the faucet body with cleaner intended to remove mineral build-up or use plain vinegar. Note: To help extend the life of the rubber seals, lubricate inside the valve body and exterior rubber components on the cartridge with silicone grease.
5
Place the new or cleaned rubber seals back into their seal seats first (if applicable). Next, Insert the disc cartridge into the faucet body aligning the tabs or pegs on the cartridge with the notches or holesin the faucet body. Replace the retainer nut, clip or screws onto the cartridge to secure it in place.
6

Replace the retainer nut, clip or screws onto the cartridge to secure it in place.
7
Reinstall the faucet Handle by placing over the cartridge and tightening the set screw with an Allen wrench. Turn water supply back on and test for leaks.